Mockito 도입
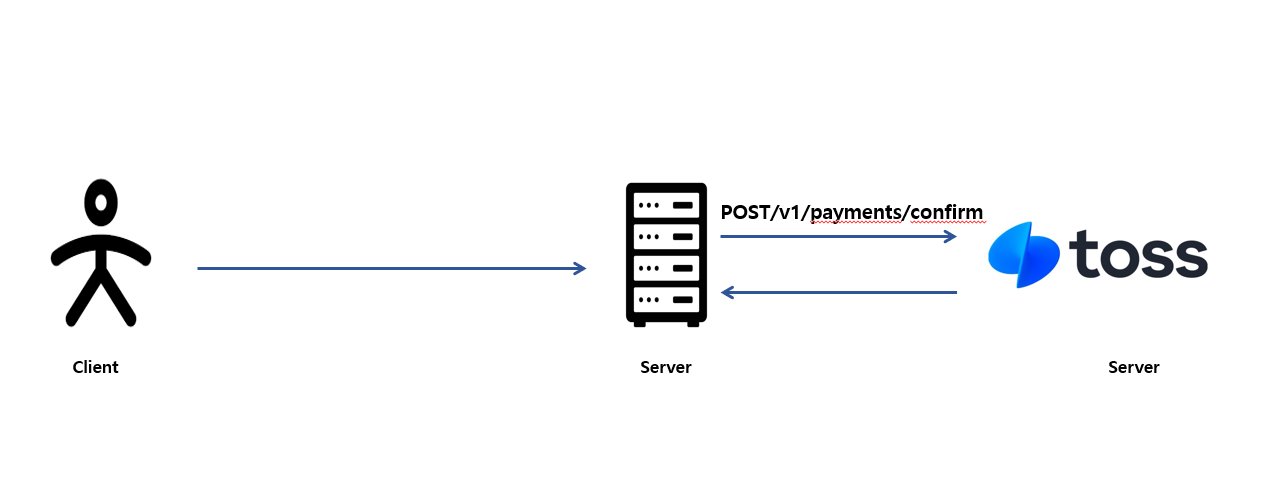
TEST 과정에서 고려해야 되는 부분이 발생되었습니다. 이렇게 매번 TEST 할때마다 Toss Server 로 결제 승인 API 를 호출 해서 TEST 해야 할까요?
Toss 서버로 상호작용 하는 로직 부분만 Mocking 처리 하므로써 이러한 의존에 대한 문제를 해결 하고자 합니다.
1 2 3 4 5 6 7 8 9 10 11 12 13 14 15 16 17 18 19 20 21 22 23 24 25 26 27 28 29 30 31 32 33 @ActiveProfiles ("test" ) @SpringBootTest class PaymentConfirmApiServiceTest { @MockBean private TossPaymentClient tossPaymentClient; @Test @DisplayName ("상품 주문 하기 위한 Confirm 기능을 실행 합니다." ) void paymentConfirm ( ...(생략)... this .createStubbingTossPostPayment (paymentKey, paymentCheckOutResponse.getOrderId (), totalAmount); ...(생략)... ...(생략)... } private void createStubbingTossPostPayment (String paymentKey, String orderId, String amount String responsePostPaymentsBody = "{\"mId\":\"tvivarepublica\",\"lastTransactionKey\":\"F69384D0887558A85A78199D534FBBD5\",\"paymentKey\":\"" + paymentKey + "\",\"orderId\":\"" + orderId + "\",\"orderName\":\"상품A 그외\",\"taxExemptionAmount\":0,\"status\":\"DONE\",\"requestedAt\":\"2024-11-30T16:53:34+09:00\",\"approvedAt\":\"2024-11-30T16:53:57+09:00\",\"useEscrow\":false,\"cultureExpense\":false,\"card\":{\"issuerCode\":\"11\",\"acquirerCode\":\"11\",\"number\":\"52361232****606*\",\"installmentPlanMonths\":0,\"isInterestFree\":false,\"interestPayer\":null,\"approveNo\":\"00000000\",\"useCardPoint\":false,\"cardType\":\"신용\",\"ownerType\":\"개인\",\"acquireStatus\":\"READY\",\"amount\":" + amount + "},\"virtualAccount\":null,\"transfer\":null,\"mobilePhone\":null,\"giftCertificate\":null,\"cashReceipt\":null,\"cashReceipts\":null,\"discount\":null,\"cancels\":null,\"secret\":\"ps_GePWvyJnrKvelyyyB2pLVgLzN97E\",\"type\":\"NORMAL\",\"easyPay\":null,\"country\":\"KR\",\"failure\":null,\"isPartialCancelable\":true,\"receipt\":{\"url\":\"https://dashboard.tosspayments.com/receipt/redirection?transactionId=tviva20241130165334qVdY4&ref=PX\"},\"checkout\":{\"url\":\"https://api.tosspayments.com/v1/payments/tviva20241130165334qVdY4/checkout\"},\"currency\":\"KRW\",\"totalAmount\":" + amount + ",\"balanceAmount\":6000,\"suppliedAmount\":5455,\"vat\":545,\"taxFreeAmount\":0,\"method\":\"카드\",\"version\":\"2022-11-16\",\"metadata\":null}" ; when (tossPaymentClient.paymentConfirm ( any (String .class ), any (PaymentConfirmInPut .class ) )).thenReturn (ResponseEntity .ok (responsePostPaymentsBody)); } }
‘tossPaymentClient’ 객체를 Mocking 처리를 하고 thenReturn 을 통해 내가 원하는 응답을 지정 할 수 있습니다.
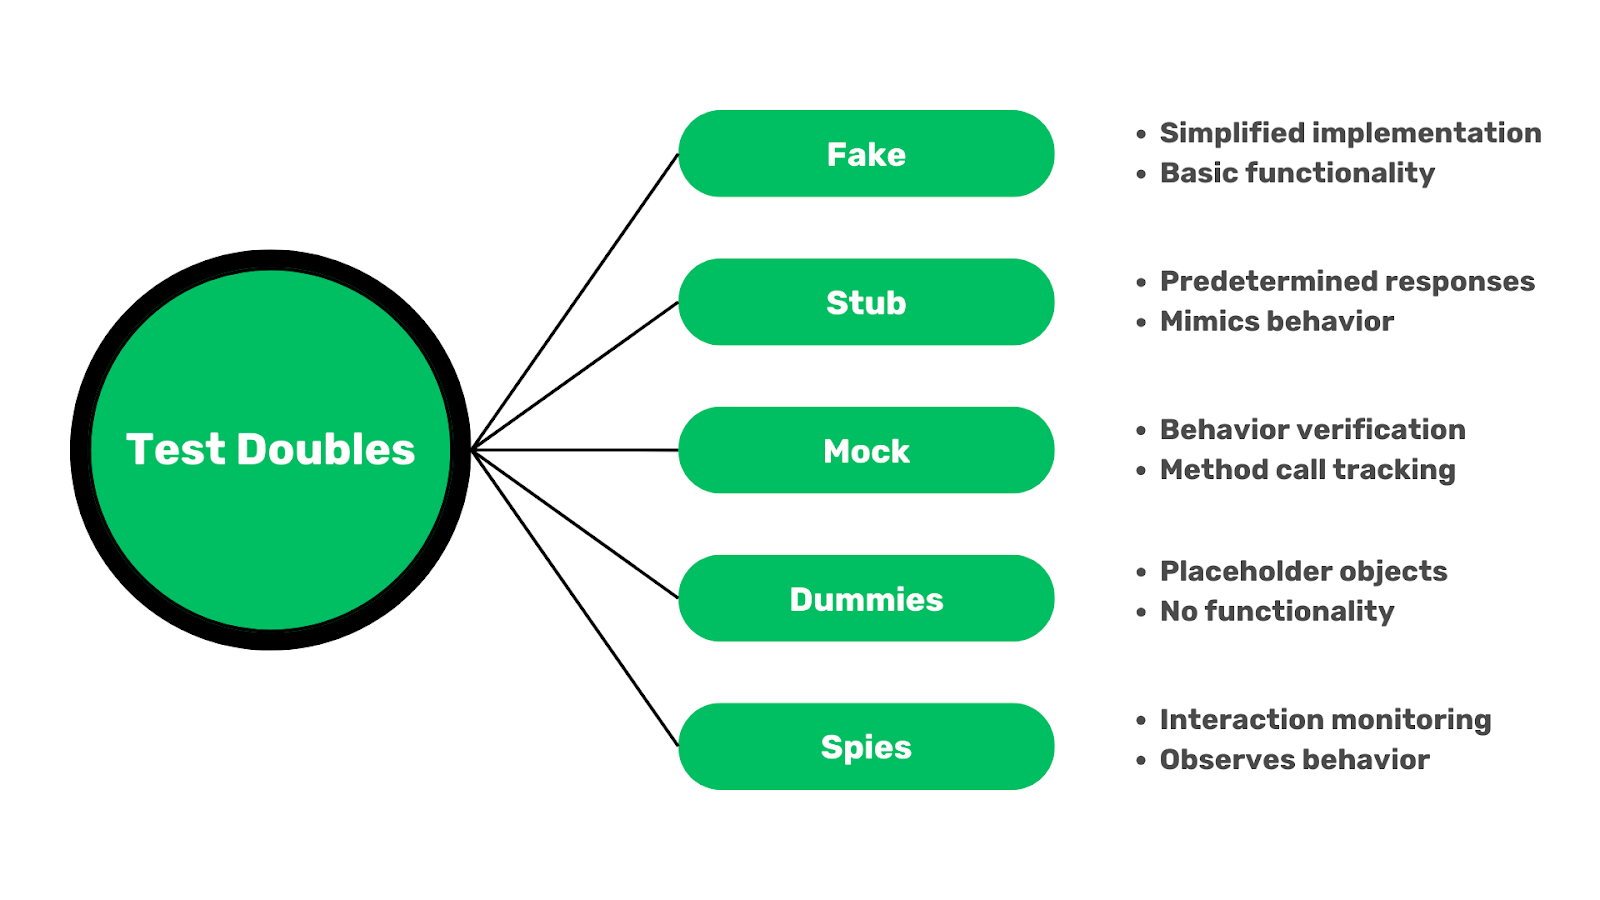
Test Double
Test Double
Dummy
Fake
Stub
Spy
Mock
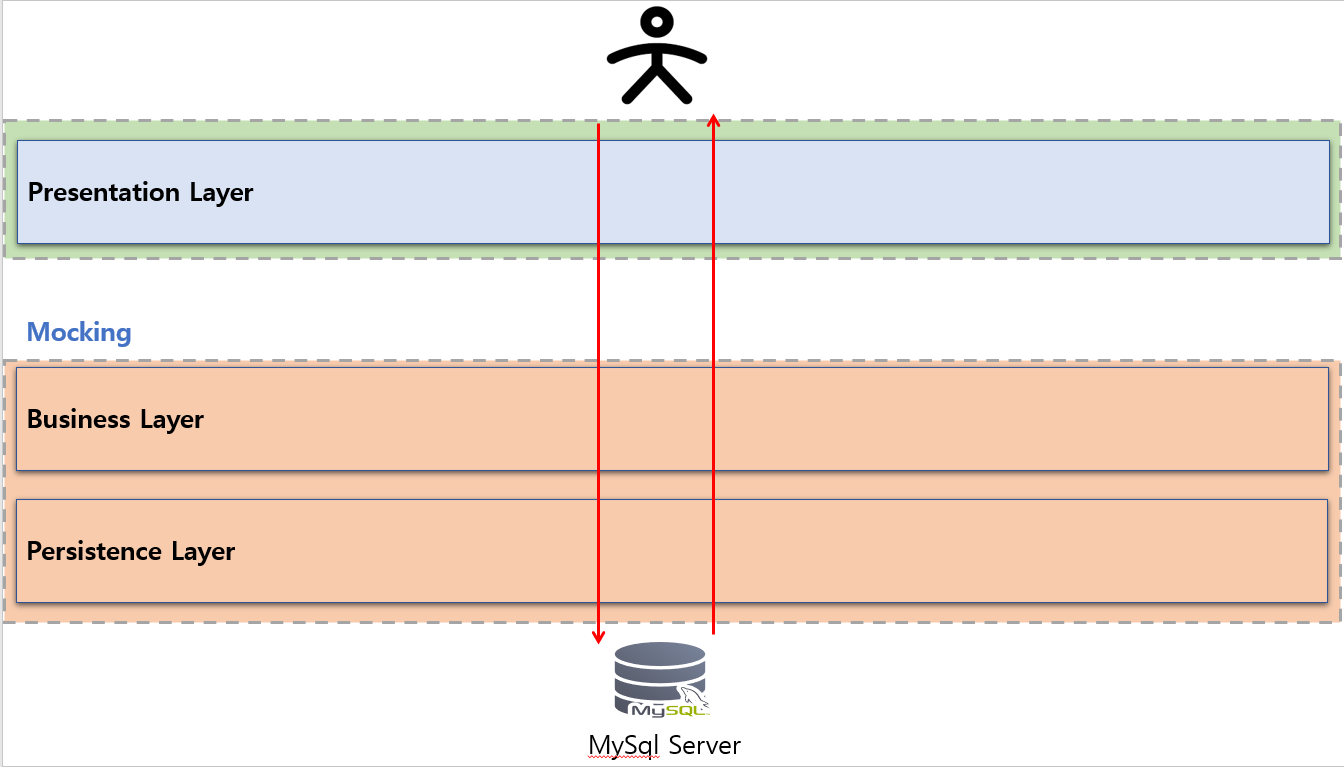
Presentation Layer 테스트
Presentation Layer 테스트 경우는 다른 Later 테스트와 다르게 가장 먼저 진입되는 테스트 계층 이라고 보면 됩니다. 즉 비지니스 로직을 진입 하기 전
Presentation Layer 계층 부분 즉 Controller 영역만 TEST 검증을 하게 되고 그외 Business Layer, Persistence Layer 계층들은 모두 Mocking
1 2 3 4 5 6 7 8 9 10 11 12 13 14 15 16 17 18 19 20 21 22 23 24 25 26 27 28 29 30 31 32 33 34 35 36 37 @WebMvcTest (controllers = { PaymentConfirmController .class }) class PaymentConfirmControllerTest { @Autowired protected MockMvc mockMvc; @Autowired protected ObjectMapper objectMapper; @MockBean private PaymentConfirmApiService paymentConfirmApiService; @Test @DisplayName ("결제 승인 confirm 처리를 하도록 합니다." ) void paymentConfirm () throws Exception { PaymentConfirmRequest request = PaymentConfirmRequest .of ("paymentKey" , "orderId" , "6000" ); mockMvc.perform ( post ("/api/payments/confirm" ) .content (objectMapper.writeValueAsString (request)) .contentType (MediaType .APPLICATION_JSON ) ) .andDo (print ()) .andExpect (status ().is2xxSuccessful ()) .andExpect (jsonPath ("$.code" ).value ("204" )) .andExpect (jsonPath ("$.status" ).value ("NO_CONTENT" )) .andExpect (jsonPath ("$.message" ).value ("NO_CONTENT" )) .andExpect (jsonPath ("$.data" ).isEmpty ()); ; } }
여기서 주목 해야 하는것은 앞써 이야기 한대로 Controller 영역만 TEST 검증을 하게 되고 그외 Business Layer, Persistence Layer 계층들은 모두 Mocking
1 2 @MockBean private PaymentConfirmApiService paymentConfirmApiService;
Controller 단에 있는 ‘PaymentConfirmController’ 부터 가장 먼저 진입 되는 ‘PaymentConfirmApiService’ 객체를 가짜 객체 통해 Mocking 하는 모습을 볼 수 있습니다.
CQRS CQRS 경우 기존 CURD 로직들을 읽기 (query) 와 쓰기 (command) 영역을 별도로 분리해서 관리하는 것 입니다. 보통의 서비스에서는 대부분 읽기 처리 부분이
읽기 (query) 와 쓰기 (command) 영역 분리하면서 책임을 분리해 서로 연관 관계를 없애서 나중에 크게 생각해 볼때 읽기 부분에 대한 부하가 많이 발생시
또 하나의 장점은 Spring 에서는 @Transaction 옵션에서 readOnly 를 통해 true, false 를 지정 할 수 있습니다.
1 @Transaction (readOnly = true )
읽기 (query) 영역에서는 해당 트랜잭션 readOnly true 로 관리 하므로 데이터베이스의 slave 영역으로만 접근 할 수 있도록 관리 할 수 있습니다.
반대로 쓰기 (command) 영역에서는 트랜잭션 readOnly false 로 관리 해서 데이버베이스 master 영역으로 접근 하도록 관리 할 수 있습니다.
추가적으로 장점이 있는데요. 트랜잭션 readOnly true 로 설정시 CUD 작업이 동작하지 않고, 스냅샷 저장, 변경 감지 (dirty check)의 작업을 수행하지 않아 성능이 향상됩니다.
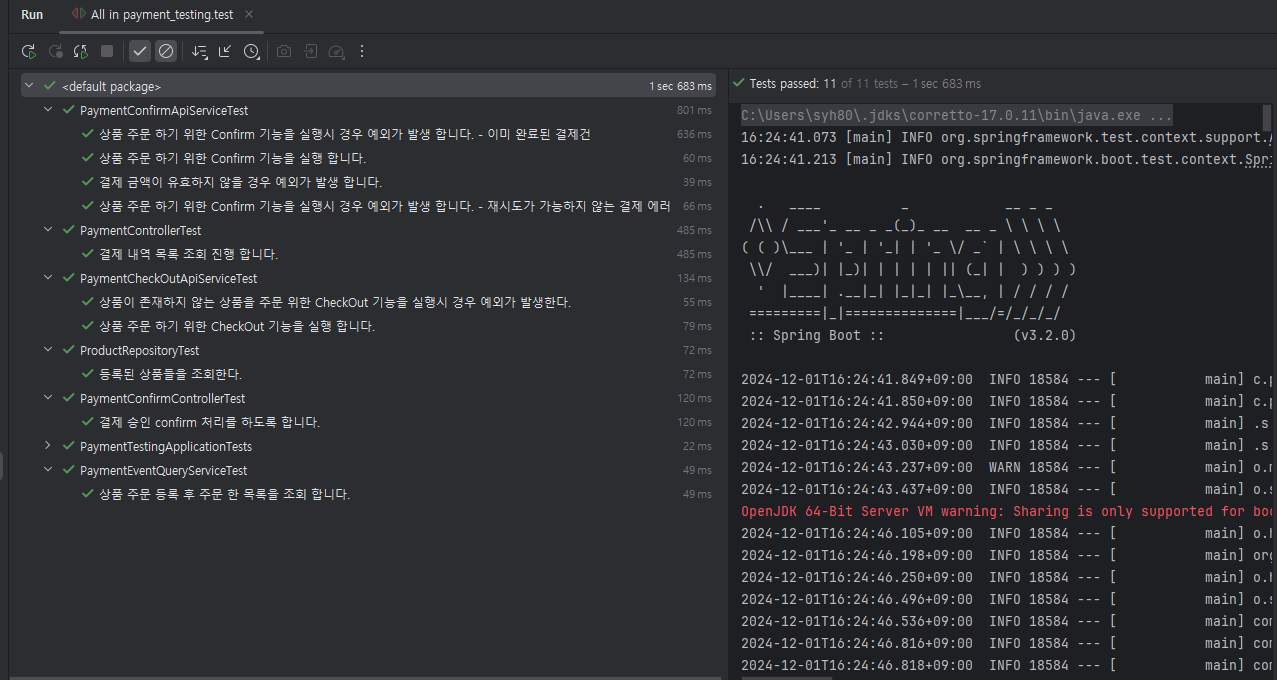
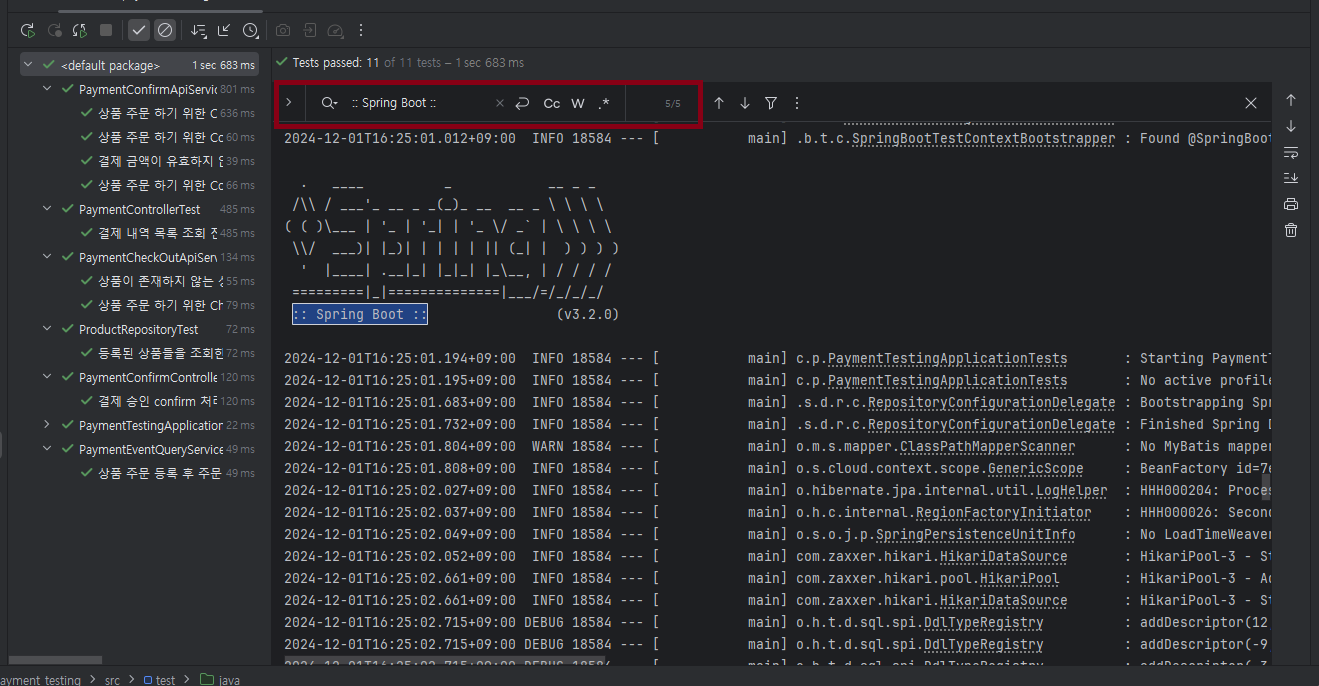
TEST 환경 통합 하기 TEST 환경 통합 설명하기 앞써서 지금까지 우리가 작성한 TEST 코드를 모두 한꺼번에 실행 한번 해볼려고 합니다.
이미지를 보시면 우리가 작성한 단일 테스트, 통합 테스트가 모두 정상적으로 통과 되는 것을 확인 할 수 있습니다.
결과 로그에서 ‘:: Spring Boot ::’ 로 검색 한번 해보면 5개가 검색 나온것을 확인 할 수 있는데요. 즉 5번 Spring Boot 서버가 띄우고 있다는 것 입니다.
왜 전체 TEST 하게 된다면 이렇게 여러번 Spring Boot 서버가 띄우게 되는 걸까요?
일단 로그를 보면 스프링 부트가 띄울때 어떤 영역부터 띄우는지 확인 할 필요가 있습니다.
Starting PaymentConfirmApiServiceTest ….
Starting PaymentControllerTest ….
Starting PaymentCheckOutApiServiceTest ….
Starting PaymentConfirmControllerTest ….
Starting PaymentTestingApplicationTests ….
우리가 TEST 코드를 작성시 각각의 TEST 코드를 실행 할때마다 스프링 부트 서버가 다시 띄우고 있다는 점 입니다. 스프링 부트에서는 각각의 TEST 가 실행
동일한 환경 속에 스프링 부트 띄우는 횟수를 최소화 하기로 하겠습니다.
1 2 3 4 5 6 7 8 @ActiveProfiles ("test" ) @SpringBootTest public abstract class IntegrationTestSupport { @MockBean protected TossPaymentClient tossPaymentClient; }
우선 ‘IntegrationTestSupport’ 클래스를 생성 하겠습니다.
1 2 3 4 5 6 7 8 9 @ActiveProfiles ("test" ) @SpringBootTest class PaymentConfirmApiServiceTest { @MockBean private TossPaymentClient tossPaymentClient; ... 생략 ... }
PaymentConfirmApiServiceTest
PaymentCheckOutApiServiceTest
PaymentTestingApplicationTests
TEST 클래스를 확인 해보시면
1 2 @ActiveProfiles ("test" ) @SpringBootTest
해당 객체를 모두 이전에 생성한 ‘IntegrationTestSupport’ 로 옮기도록 합니다.
그런 다음 ‘@MockBean’ 으로 등록한 객체들도 모두 ‘IntegrationTestSupport’ 로 옮기도록 합니다.
TEST 작성한 객체는 ‘IntegrationTestSupport’ extend 하도록 합니다.
1 2 3 4 5 6 7 8 9 10 11 12 13 14 15 16 17 18 19 20 21 22 @WebMvcTest (controllers = { PaymentCheckoutController .class , PaymentConfirmController .class , PaymentController .class }) public abstract class ControllerTestSupport { @Autowired protected MockMvc mockMvc; @Autowired protected ObjectMapper objectMapper; @MockBean protected PaymentApiService paymentApiService; @MockBean protected PaymentConfirmApiService paymentConfirmApiService; @MockBean protected PaymentCheckOutApiService paymentCheckOutApiService; }
이번에는 Controller 단 TEST 전용 통합 ‘ControllerTestSupport’ 객체를 만들도록 합니다.
PaymentControllerTest
PaymentConfirmControllerTest
Controller 객체를 모두 동일하게 @WebMvcTest 에노테이션 코드를 ‘ControllerTestSupport’ 객체로 옮기도록 합니다.
TEST 작성한 Controller 객체는 ‘ControllerTestSupport’ extend 하도록 합니다.
이렇게 한 다음 다시 전체 TEST 를 하도록 하겠습니다.
이렇게 기존에 5번 스프링 부트가 반복적으로 띄워졌는데 이번에는 2번으로 줄였습니다.
Copyright 201- syh8088. 무단 전재 및 재배포 금지. 출처 표기 시 인용 가능.