Spring Security SessionManagementFilter And ConcurrentSessionFilter
SessionManagementFilter 는 크게
세션 관리
동시적 세션 제어 (1. 인증 실패 전략 2. 세션 만료 전략)
세션 고정 보호
세션 생성 정책
이렇게 기능을 세분화 및 순서로 진행 하게 됩니다.
함께 알아 보는 ConcurrentSessionFilter 경우 SessionManagementFilter 의 동시적 세션 제어 에 관여 하고 있다.
주로 계속 되는 요청 마다 해당 사용자의 세션 만료 체크 및 세션 만료시 해당 세션 만료 시키는 역활을 한다.
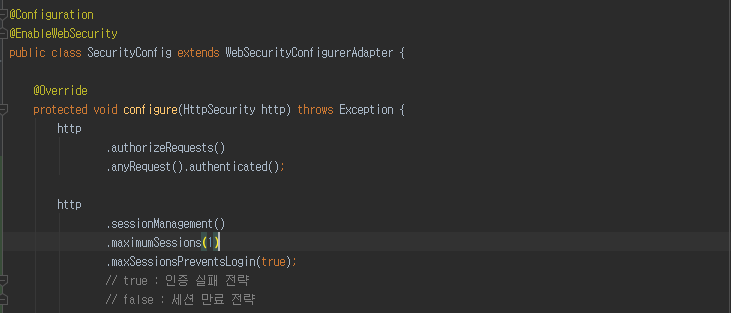
해당 Spring Security 설정 Class 에서 sessionManagement() 설정 중
maximumSession 즉 최대 세션 허용 수는 1개로 지정 하겠다.
maxSessionsPreventsLogin 경우 해당 동일한 유저가 로그인시 true (인증 실패 전략) 와 false(세션 만료 전략) 통해 전략을
세분화 하는 설정 입니다. (동시적 세션 제어 전략)
CompositeSessionAuthenticationStrategy 1 2 3 4 5 6 7 8 9 10 11 12 13 14 15 16 public class CompositeSessionAuthenticationStrategy implements SessionAuthenticationStrategy { ... 생략 ... public void onAuthentication(Authentication authentication, HttpServletRequest request, HttpServletResponse response) throws SessionAuthenticationException { SessionAuthenticationStrategy delegate; for(Iterator var4 = this.delegateStrategies.iterator(); var4.hasNext(); delegate.onAuthentication(authentication, request, response)) { delegate = (SessionAuthenticationStrategy)var4.next(); if (this.logger.isDebugEnabled()) { this.logger.debug("Delegating to " + delegate); } } } ... 생략 ... }
CompositeSessionAuthenticationStrategy 통해 Spring Security 세션 관련 로직이 호출 한다.
1 for(Iterator var4 = this.delegateStrategies.iterator(); var4.hasNext(); delegate.onAuthentication(authentication, request, response)) {
for 문을 돌아서 차례대로 세션 관련 로직 호출
ConcurrentSessionControlAuthenticationStrategy 1 2 3 4 5 6 7 8 9 10 11 12 13 14 15 16 17 18 19 20 21 22 23 24 25 // ConcurrentSessionControlAuthenticationStrategy 클래스 public void onAuthentication(Authentication authentication, HttpServletRequest request, HttpServletResponse response) { List<SessionInformation> sessions = this.sessionRegistry.getAllSessions(authentication.getPrincipal(), false); int sessionCount = sessions.size(); int allowedSessions = this.getMaximumSessionsForThisUser(authentication); if (sessionCount >= allowedSessions) { if (allowedSessions != -1) { if (sessionCount == allowedSessions) { HttpSession session = request.getSession(false); if (session != null) { Iterator var8 = sessions.iterator(); while(var8.hasNext()) { SessionInformation si = (SessionInformation)var8.next(); if (si.getSessionId().equals(session.getId())) { return; } } } } this.allowableSessionsExceeded(sessions, allowedSessions, this.sessionRegistry); } } }
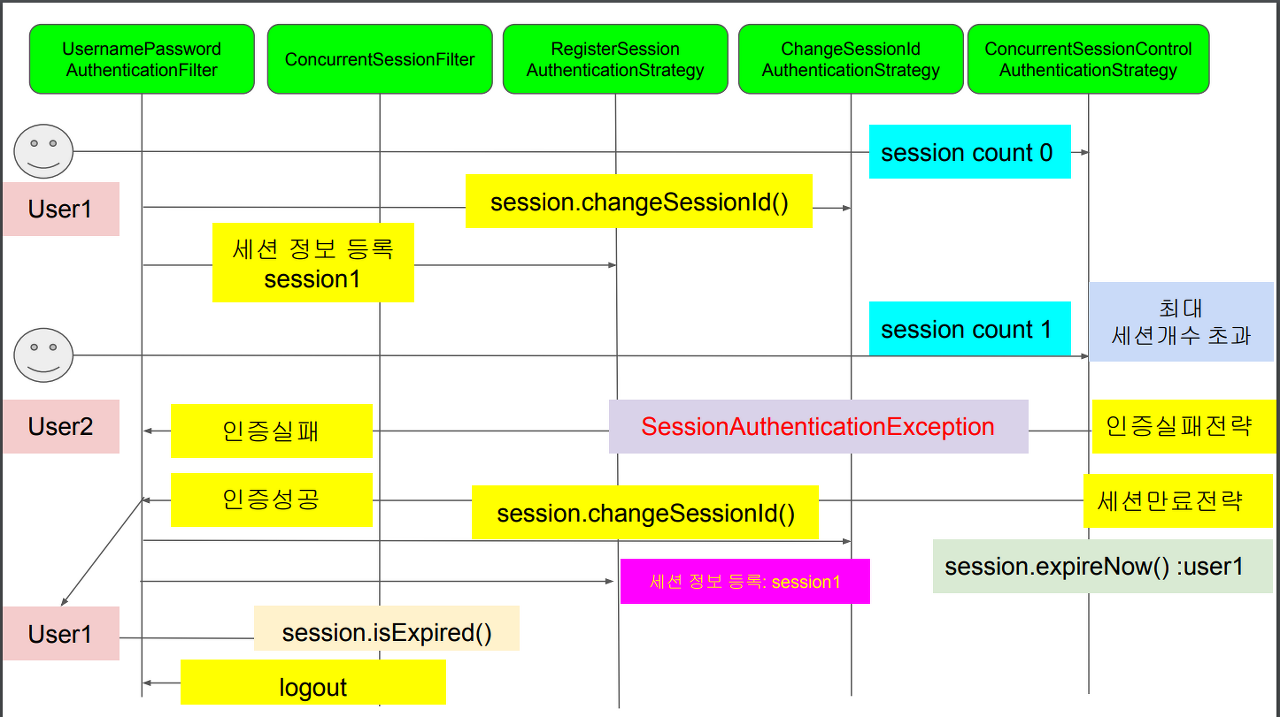
SessionManagementFilter Flow 첫번째 관문인 ConcurrentSessionControlAuthenticationStrategy 입니다.
해당 클래스 주 업무는 해당 사용자의 동시적 세션 제어 담당 합니다.
1 2 List<SessionInformation > int sessionCount = sessions.size();
해당 유저가 맨 처음 로그인을 하게 되면 현재 해당 유저가 가지고 있는 세션 Count 를 가져 옵니다.
맨 처음 로그인을 하게 되는 것이니 당연 sessionCount 는 0 이다.
1 int allowedSessions = this.getMaximumSessionsForThisUser(authentication);
초기 Spring Security Config 에서 maximumSession 을 1로 설정 했었는데
1 if (sessionCount >= allowedSessions) {
allowedSessions (maximumSession 에서 설정 한 1) 과 sessionCount (현재 해당 유저 세션 Count)
즉 현재 해당 유저 세션 Count 숫자가 maximumSession 에서 설정한 Count 숫자 보다 크면 해당 Flow 대로 진행 하지 않는다.
return 통해 CompositeSessionAuthenticationStrategy 클래스의 onAuthentication 메소로 돌아 가게 되고 그 다음 로직이 실행 된다.
ChangeSessionIdAuthenticationStrategy 그 다음은 세션 고정 보호 기능을 담당 하는 ChangeSessionIdAuthenticationStrategy 클래스가 호출 됩니다.
1 2 3 4 // AbstractSessionFixationProtectionStrategy 클래스 protected void onSessionChange(String originalSessionId, HttpSession newSession, Authentication auth) { this.applicationEventPublisher.publishEvent(new SessionFixationProtectionEvent(auth, originalSessionId, newSession.getId())); }
ChangeSessionIdAuthenticationStrategy 클래스 Abstract AbstractSessionFixationProtectionStrategy 클래스 에서
기존 세션 정보를 새로운 세션 정보로 변경하는 로직 입니다.
최종적으로 return 통해 CompositeSessionAuthenticationStrategy 클래스의 onAuthentication 메소로 돌아 가게 된다.
RegisterSessionAuthenticationStrategy 해당 유저의 세션 정보를 등록 하는 역활 담당 합니다.
1 2 3 4 5 6 7 8 9 public class RegisterSessionAuthenticationStrategy implements SessionAuthenticationStrategy { private final SessionRegistry sessionRegistry; ... 생략 ... public void onAuthentication(Authentication authentication, HttpServletRequest request, HttpServletResponse response) { this.sessionRegistry.registerNewSession(request.getSession().getId(), authentication.getPrincipal()); } }
this.sessionRegistry.registerNewSession() 호출 해서 해당 유저 세션 정보를 저장 하게 된다.
1 2 3 4 5 6 7 8 9 10 11 public class SessionRegistryImpl implements SessionRegistry, ApplicationListener<SessionDestroyedEvent > ... 생략 ... public void registerNewSession(String sessionId, Object principal) { ... 생략 this.sessionIds.put(sessionId, new SessionInformation(principal, sessionId, new Date())); ... 생략 ... } }
SessionRegistryImpl -> registerNewSession 메소드 실행 되면서 세션 정보 저장 한다.
해당 동일한 유저로 다른 브라우저 통해 로그인 해보자 1 2 3 4 5 6 7 8 9 10 11 12 13 14 15 16 17 18 19 20 21 22 23 24 25 // ConcurrentSessionControlAuthenticationStrategy 클래스 public void onAuthentication(Authentication authentication, HttpServletRequest request, HttpServletResponse response) { List<SessionInformation> sessions = this.sessionRegistry.getAllSessions(authentication.getPrincipal(), false); int sessionCount = sessions.size(); int allowedSessions = this.getMaximumSessionsForThisUser(authentication); if (sessionCount >= allowedSessions) { if (allowedSessions != -1) { if (sessionCount == allowedSessions) { HttpSession session = request.getSession(false); if (session != null) { Iterator var8 = sessions.iterator(); while(var8.hasNext()) { SessionInformation si = (SessionInformation)var8.next(); if (si.getSessionId().equals(session.getId())) { return; } } } } this.allowableSessionsExceeded(sessions, allowedSessions, this.sessionRegistry); } } }
다시 ConcurrentSessionControlAuthenticationStrategy 클래스로 돌아가보자
그럼 sessionCount (이전에 해당 유저 로그인 했으니 1로 나올 것이다.)
allowedSessions (초기 Spring Security Config 에서 maximumSession 을 1로 설정 한것)
1 if (sessionCount >= allowedSessions)
해당 조건이 만족 될것 이고
1 this.allowableSessionsExceeded(sessions, allowedSessions, this.sessionRegistry);
해당 allowableSessionsExceeded 실행 하게 된다.
1 2 3 4 5 6 7 8 9 10 11 12 13 14 15 16 17 // ConcurrentSessionControlAuthenticationStrategy 클래스 protected void allowableSessionsExceeded(List<SessionInformation > if (!this.exceptionIfMaximumExceeded && sessions != null) { sessions.sort(Comparator.comparing(SessionInformation::getLastRequest)); int maximumSessionsExceededBy = sessions.size() - allowableSessions + 1; List<SessionInformation> sessionsToBeExpired = sessions.subList(0, maximumSessionsExceededBy); Iterator var6 = sessionsToBeExpired.iterator(); while(var6.hasNext()) { SessionInformation session = (SessionInformation)var6.next(); session.expireNow(); } } else { throw new SessionAuthenticationException(this.messages.getMessage("ConcurrentSessionControlAuthenticationStrategy.exceededAllowed", new Object[]{allowableSessions}, "Maximum sessions of {0} for this principal exceeded")); } }
여기서
1 if (!this.exceptionIfMaximumExceeded && sessions != null)
이것은 exceptionIfMaximumExceeded 초기 Spring Security Session Setting 에서 maxSessionsPreventsLogin 설정에서 true 로
했다면 this.exceptionIfMaximumExceeded 값은 true 입니다.
결국 else 문으로 빠져 나와서
1 throw new SessionAuthenticationException(this.messages.getMessage("ConcurrentSessionControlAuthenticationStrategy.exceededAllowed", new Object[]{allowableSessions}, "Maximum sessions of {0} for this principal exceeded"));
SessionAuthenticationException 에러를 던지게 됩니다. 즉 두번째 동일 유저가 로그인 사용자는 실패 되면서 로그인 불가능 하게 됩니다.
만약 다시 초기 Spring Security Session Setting 에서 maxSessionsPreventsLogin 설정에서 false 로 준다면
else 문이 아닌 if 문으로 로직 실행 하게 됩니다.
여기서 중요한 로직이 있는데
이전 동일 사용자 세션을 만료 시킵니다.
maxSessionsPreventsLogin true (인증 실패 전략) 경우는 살펴보았고 두번째 전략인 maxSessionsPreventsLogin
false(세션 만료 전략) 을 알아 보겠다.
Spring Security Config 클래스에서 maxSessionsPreventsLogin 을 false 로 지정 한 후 다시 실행 해보자
1 2 3 4 http .sessionManagement() .maximumSessions(1) .maxSessionsPreventsLogin(false); // 세션 만료 전략
실행 한 후 첫번째 동일 사용자가 로그인 후 다른 브라우저 통해 동일 사용자 로그인을 한다.
그런 다음 첫번째 동일 사용자의 브라우저를 실행(브라우저 새로고침) 하게 된다면
ConcurrentSessionFilter 1 2 3 4 5 6 7 8 9 10 11 12 13 14 15 16 17 18 19 20 21 22 23 24 25 26 27 28 29 30 public class ConcurrentSessionFilter extends GenericFilterBean { ... 생략 ... public void doFilter(ServletRequest req, ServletResponse res, FilterChain chain) throws IOException, ServletException { HttpServletRequest request = (HttpServletRequest)req; HttpServletResponse response = (HttpServletResponse)res; HttpSession session = request.getSession(false); if (session != null) { SessionInformation info = this.sessionRegistry.getSessionInformation(session.getId()); if (info != null) { if (info.isExpired()) { if (this.logger.isDebugEnabled()) { this.logger.debug("Requested session ID " + request.getRequestedSessionId() + " has expired."); } this.doLogout(request, response); this.sessionInformationExpiredStrategy.onExpiredSessionDetected(new SessionInformationExpiredEvent(info, request, response)); return; } this.sessionRegistry.refreshLastRequest(info.getSessionId()); } } chain.doFilter(request, response); } ... 생략 ... }
동시적 세션 제어에 관여 하는 ConcurrentSessionFilter 클래스가 실행 하게 됩니다.
1 SessionInformation info = this.sessionRegistry.getSessionInformation(session.getId());
접속한 해당 사용자의 세션 정보를 가지고 와서
해당 사용자가 만료 되었는지 확인합니다.
이전에 두번째 브라우저 통해 동일 사용자가 로그인시 ConcurrentSessionControlAuthenticationStrategy 클래스
allowableSessionsExceeded 메소드 에서
세션 만료 시켰기 때문에 true 가 되면서
1 this.doLogout(request, response);
해당 사용자 로그아웃을 시킨다.
Copyright 201- syh8088. 무단 전재 및 재배포 금지. 출처 표기 시 인용 가능.