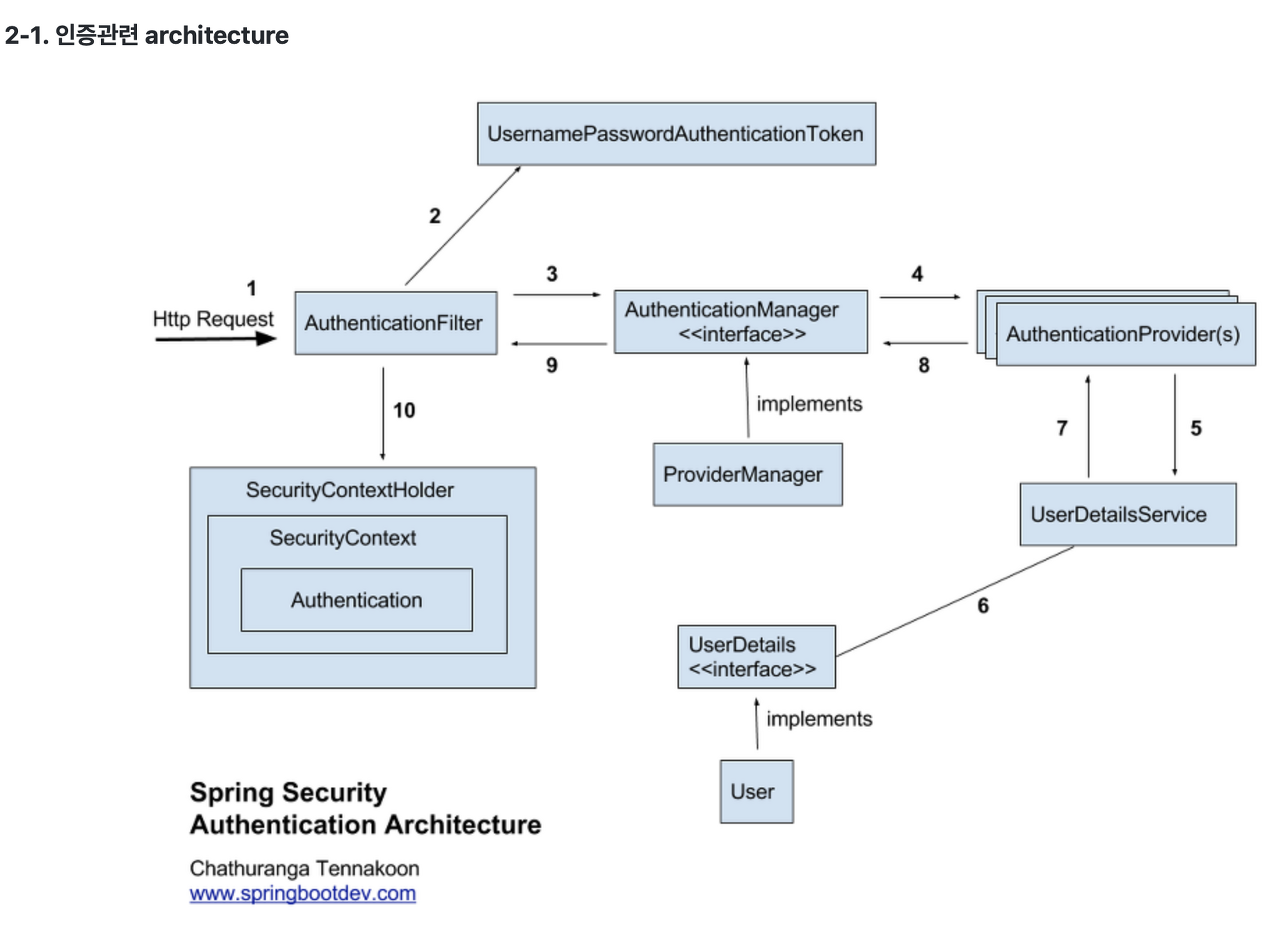
Spring Security UsernamePasswordAuthenticationFilter Login Form 인증을 담당하고 있는 UsernamePasswordAuthenticationFilter 를 통해 처리 Flow 를 알아보자
UsernamePasswordAuthenticationFilter 는 사용자가 Form Login 방식에서 로그인 하게 되면
담당 및 처리 하는 Filter 입니다.
사용자가 로그인시 Spring Security 에서 거쳐가는 흐름을 하나하나씩 알아보자
UsernamePasswordAuthenticationFilter 1 2 3 4 5 6 7 8 9 10 11 12 13 14 15 16 17 18 19 20 21 22 23 24 25 26 27 28 29 30 31 32 33 34 35 36 37 38 39 40 public abstract class AbstractAuthenticationProcessingFilter extends GenericFilterBean implements ApplicationEventPublisherAware, MessageSourceAware { public void doFilter(ServletRequest req, ServletResponse res, FilterChain chain) throws IOException, ServletException { HttpServletRequest request = (HttpServletRequest)req; HttpServletResponse response = (HttpServletResponse)res; if (!this.requiresAuthentication(request, response)) { chain.doFilter(request, response); } else { if (this.logger.isDebugEnabled()) { this.logger.debug("Request is to process authentication"); } Authentication authResult; try { authResult = this.attemptAuthentication(request, response); if (authResult == null) { return; } this.sessionStrategy.onAuthentication(authResult, request, response); } catch (InternalAuthenticationServiceException var8) { this.logger.error("An internal error occurred while trying to authenticate the user.", var8); this.unsuccessfulAuthentication(request, response, var8); return; } catch (AuthenticationException var9) { this.unsuccessfulAuthentication(request, response, var9); return; } if (this.continueChainBeforeSuccessfulAuthentication) { chain.doFilter(request, response); } this.successfulAuthentication(request, response, chain, authResult); } } }
사용자가 아이디 및 비밀번호를 입력 후 전송 버튼을 클릭 하게 되면(FORM 로그인 방식)
UsernamePasswordAuthenticationFilter 부모 클래스인 AbstractAuthenticationProcessingFilter 가 먼저 담당 하게 된다.
즉 인증 처리를 담당 하고 처리 할 수 있도록 하는 Filter 입니다.
1
2
3
if (!this.requiresAuthentication(request, response)) { chain.doFilter(request, response); }
1
2
3
protected boolean requiresAuthentication(HttpServletRequest request, HttpServletResponse response) { return this.requiresAuthenticationRequestMatcher.matches(request); }
기존 지정된 login 페이지가 아니라면 chain.doFilter 즉 다음 필터로 가서 인증 Flow 로 가지 않고
지정한 것에 login 페이지가 일치 하게 된다면 인증 Flow 로 가게 된다.
1
2
// AbstractAuthenticationProcessingFilter authResult = this.attemptAuthentication(request, response);
1
2
3
4
5
6
7
8
9
10
11
12
13
14
15
16
17
18
19
20
21
// UsernamePasswordAuthenticationFilter public Authentication attemptAuthentication(HttpServletRequest request, HttpServletResponse response) throws AuthenticationException { if (this.postOnly && !request.getMethod().equals("POST")) { throw new AuthenticationServiceException("Authentication method not supported: " + request.getMethod()); } else { String username = this.obtainUsername(request); String password = this.obtainPassword(request); if (username == null) { username = ""; } if (password == null) { password = ""; } username = username.trim(); UsernamePasswordAuthenticationToken authRequest = new UsernamePasswordAuthenticationToken(username, password); this.setDetails(request, authRequest); return this.getAuthenticationManager().authenticate(authRequest); } }
그다음 attemptAuthentication 메소드를 호출 하는데 구현체인 UsernamePasswordAuthenticationFilter 의
이 메소드는 입력한 아이디 및 비밀번호를 추출 하고 이것을 이용해 Authentication 객체를 생성 한다.
1 return this.getAuthenticationManager().authenticate(authRequest);
Authentication 객체를 만들어서 AuthenticationManager 로 전달 하게 된다.
AuthenticationManager Authentication 받고 총괄적으로 인증 처리 하는 것이 AuthenticationManager 객체 입니다.
1
2
3
4
5
6
7
8
9
10
11
12
13
14
15
16
17
18
19
20
21
22
// AuthenticationManager 구현체인 ProviderManager 클래스 public Authentication authenticate(Authentication authentication) throws AuthenticationException { ... 생략 ... Iterator var8 = this.getProviders().iterator(); while(var8.hasNext()) { AuthenticationProvider provider = (AuthenticationProvider)var8.next(); ... 생략 ... try { result = provider.authenticate(authentication); if (result != null) { this.copyDetails(authentication, result); break; } } ... 생략 ... }
여러 AuthenticationProvider 중에 FORM 로그인 관련 된 Provider 를 loop 통해 해당 되는 것만 가져오는 로직 이다.
1 result = provider.authenticate(authentication);
그리고 AuthenticationProvider 에게 인증 처리를 위임 하게 된다.
AuthenticationProvider 실질적으로 인증 처리를 담당 하는 것이 AuthenticationProvider 라고 할 수 있다.
기본 Default 인 AuthenticationProvider 구현체 AbstractUserDetailsAuthenticationProvider 에서 처리하지만
대부분 협업에서는 AuthenticationProvider Override 해서 구현 한다. 이 글에서는 실제로 구현체를 직접 만들어서 설명 하고자 한다.
1
2
3
4
5
6
7
8
9
10
11
12
13
14
15
16
17
18
19
20
21
22
23
// 직접 AuthenticationProvider 구현체인 CustomAuthenticationProvider 클래스를 만들었다. public class CustomAuthenticationProvider implements AuthenticationProvider { @Autowired private UserDetailsService userDetailsService; @Autowired private PasswordEncoder passwordEncoder; @Override @Transactional public Authentication authenticate(Authentication authentication) throws AuthenticationException { String username = authentication.getName(); String password = (String) authentication.getCredentials(); AccountContext accountContext = (AccountContext) userDetailsService.loadUserByUsername(username); if (!passwordEncoder.matches(password, accountContext.getAccount().getPassword())) { throw new BadCredentialsException("BadCredentialsException"); } return new AbstractAuthenticationToken(accountContext.getMember(), null, accountContext.getAuthorities()); }
해당 Authentication 인증 객체 통해 실제 저장된 해당 사용자 데이터를 DB 통해 가져와
매칭 하고 성공 및 실패에 따라 각각 다른 역활을 하게 된다. (UserDetailsService 에 대한 자세한 설명은 나중에 하도록 하겠다.)
실패 경우 AuthenticationException trow 하게 된다.
성공 경우 AbstractAuthenticationToken 객체를 생성 후 AuthenticationProvider 그리고 다시 AuthenticationManager 에게 다시 되돌려 준다.
SecurityContext 에 인증 객체 저장 1 2 3 4 5 6 7 8 9 10 11 public void doFilter(ServletRequest req, ServletResponse res, FilterChain chain) throws IOException, ServletException { ... 생략 ... Authentication authResult; try { authResult = this.attemptAuthentication(request, response); if (authResult == null) { return; } ... 생략 ... this.successfulAuthentication(request, response, chain, authResult);
인증 성공 후 Authentication 객체 생성 하고 AbstractAuthenticationProcessingFilter 까지 다시 전달 하게 된다.
전달 받은 객체 authResult 는
1
2
// AbstractAuthenticationProcessingFilter 클래스 this.successfulAuthentication(request, response, chain, authResult);
1
2
3
4
5
6
7
8
9
// AbstractAuthenticationProcessingFilter 클래스 protected void successfulAuthentication(HttpServletRequest request, HttpServletResponse response, FilterChain chain, Authentication authResult) throws IOException, ServletException { .. 생략 ... SecurityContextHolder.getContext().setAuthentication(authResult); ... 생략... this.successHandler.onAuthenticationSuccess(request, response, authResult); }
SecurityContext 에 해당 인증된 객체를 저장 하고
Copyright 201- syh8088. 무단 전재 및 재배포 금지. 출처 표기 시 인용 가능.